How to Add PowerPoint to Blogger - The Definitive Guide

by
One of the most asked Blogger questions on forums and help sites is 'How do I add a PowerPoint presentation within Blogger?'  It surprises me that many of the answers talk about multiple conversion techniques such as to Adobe PDF or to bitmap files to embed as pictures. Also, there are multiple slide sharing sites such as Slideshare.net, Scribd.com and Docstoc.com that can be used as upload sites to host your presentation and then share publicly.

Though these options are valid, the best option is to use a Microsoft tool since the level of support for the presentation view will be the highest. This is actually a very easy option and allows you to keep your presentation in the .ppt or .pptx formats.

Using Microsoft OneDrive for PowerPoint

What you may not have realized is that Microsoft's Live products - one of which is OneDrive, allows you to upload your PowerPoint presentations, edit them in place and then embed them into any web site with a viewer. Plus, OneDrive is free cloud storage with an initial limit of 5GB which should handle most PowerPoint presentations. You can always start paying for more storage if you need it.

Setting up a Microsoft Live account with OneDrive is easy to do - if you have a Hotmail account you may already have one. Just go to the Microsoft OneDrive Signup page to start and create your account. Note the message I highlighted if you do not have a Hotmail or Live account already:
Microsoft Skydrive login page


Hide the Blogger Sidebar - Quick Tip

by
Hide the Blogger Sidebar on a Static Page
Many times when you want a static home page you don't want to see the sidebar widgets. You probably noticed that on my test site for the Static Home Page I was able to hide the sidebar that you normally see on you layout in the blog posting page. Removing this is a simple trick and just requires some basic CSS and Blogger template code to adjust. The key to doing this is to simply use CSS to hide, or, display:none on your sidebars and then adjust the width of your page to fit your design needs.

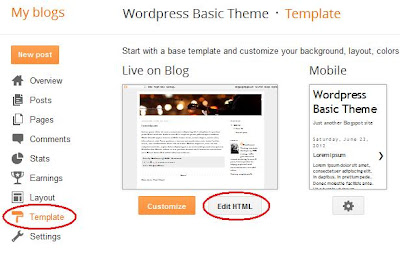
First step is to just into your Blogger template editor and then choose the 'Edit HTML' button like this:

Edit the HTML of your Blogger template
Click the 'Proceed' button to jump into your template. You don't have to worry about 'Expand Widget Templates' here because we're only working within the CSS section. Seach for the part of your template that has the keyword ]]></b:skin> like this:


You can see the section I've highlighted in my circled region - plus, I've shown about how far down in the template you need to go to find it.

Add a Slider to Blogger

by
APRIL 2013 UPDATE!! Serveral readers have discovered that part of this tutorial does not work for domains other than the standard Blogspot.com domains. There is a fix here, however!! If you have a custom domain you will need to follow this tutorial - but also the section called 'Addendum 1' at the bottom of this post in order for the slider to work correctly.

Life can get pretty darn busy at this time of year. I had to take some time off posting just to get my grad school work done as well as my job. There's a ton of new tutorials I have in my back pocket but just haven't had time yet to do the work. But, my paper is done for school and I'm now relaxing in a snow storming weekend.

What I didn't expect was that I would be spending hours trying to find a good image slider for Blogger that didn't run into weird problems or wasn't too complex to implement. Image sliders are very cool but are implemented in so many different ways - typically in Flash or Javascript. In this case I had to work through about four different free sliders to find one I liked or that worked right. Blogger does have a Slideshow gadget, but it doesn't have any real customizable features.

Let's get started. The Image Slider template I chose is from a company called Menucool.com and offers a free slider framework. You can view a sample of it in action by clicking on the image in the upper left of this post. The part that sold me on it was the fact that it didn't require JQuery script code in order for it to be implemented. That's good for us because it reduces the load time for your blog and is easier to install (note that easier is relative here - it is still a bit of a trick to get it setup correctly).

Uploading and Installing the Main Script

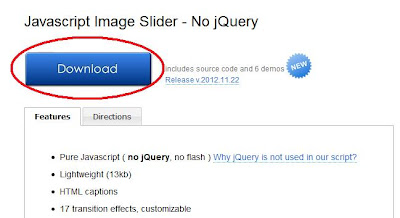
The main Javascript code for Menucool requires you to install some javascript code somewhere. Well, as you know Blogger doesn't have a place to install a file. You could extract the script and embed it into your template. But, I like to add it to Google Sites as a file then reference it. Your first step is to go to the Menucool.com Javascript Slider page. From there scroll down a bit to download the image slider code. All we want right now is the main Javascript file - click on the Download button:

Menucool javascript for Blogger image slider